Sanket Ghorpade

Search–>Patterns—>Connect—->Innovate

Let’s understand Azure AD application and it’s permissions – Part 2 — November 1, 2020

Let’s understand Azure AD application and it’s permissions – Part 2

Namaste and welcome back to my blog post.

This post is in continuation with the previous post where I explained about the Azure AD application and the permissions. In this post, I am going to cover the remaining part of the webinar which I took last week.

We are going to explore: –

How you can authenticate a user using AD application? How OAuth2.0 plays a role here.

How permission and consent that we set works here?

How you can access delegated permission without making the user login every time?

Earlier I planned to cover all these topics but recently my very good friend Omkar Khair took an awesome webinar on OAuth. He has explained how we OAuth the way we do. So, rather than repeating the same information here. I will suggest you visit his blog post (link will be published by next week) to dig deep about OAuth 2.0.

Meanwhile, I will cover the above topics in brief: –

Let’s try to understand how you can authenticate a user using the AD application.

To authenticate a user with Azure AD application OAuth flow is used. We will be exploring OAuth 2.0 authorization code grant flow in this blog post. You can find the most authentic information about OAuth protocol here

I have broken down the OAuth 2.0 auth code grant flow in simple terms that I understand. There are multiple ways by which OAuth 2.0 can be executed like by using implicit grant flow, auth code grant, on-behalf of flow and few other which you can find here.

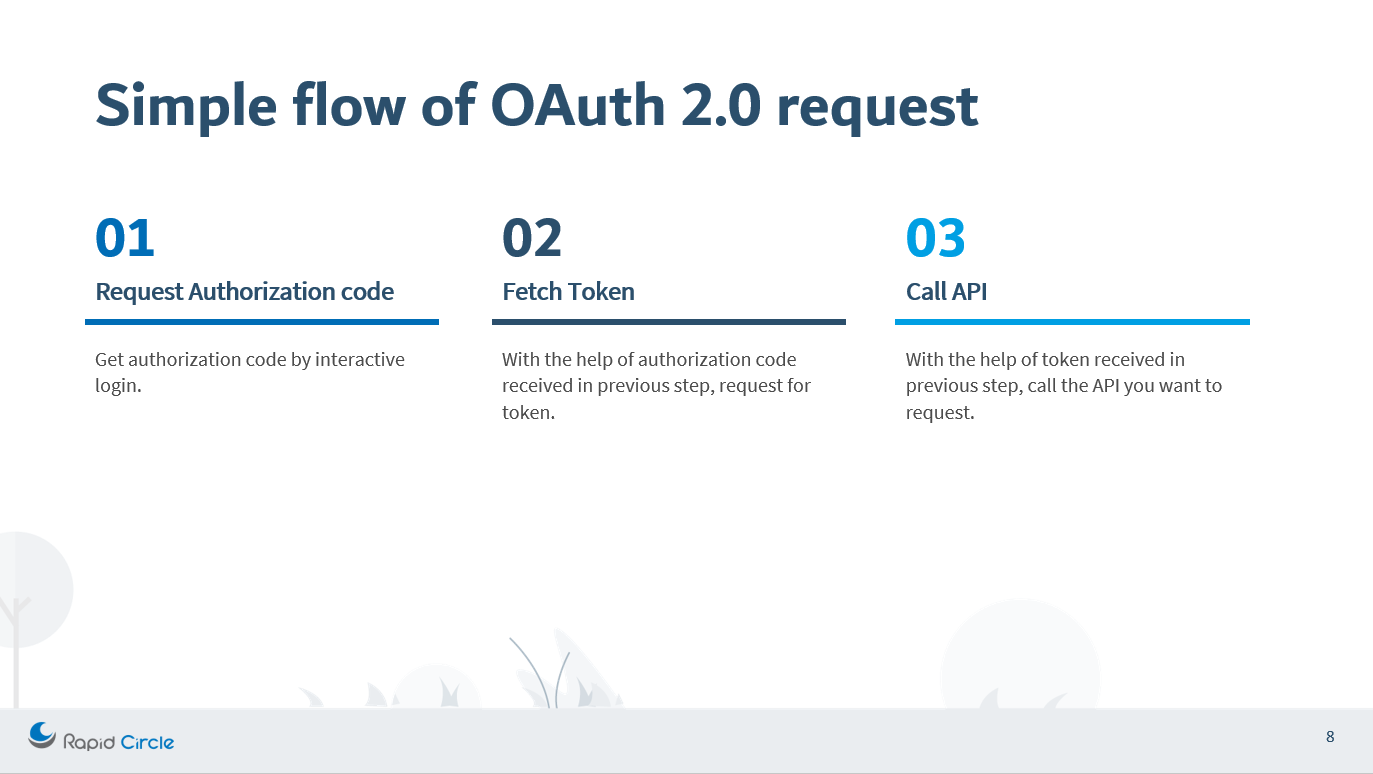
To simply put the authentication code grant flow, I have divided it into 3 parts: –

  1. Requesting Authorization code
  2. Fetching access token
  3. Calling the API

To request an authorization code, you will need: –

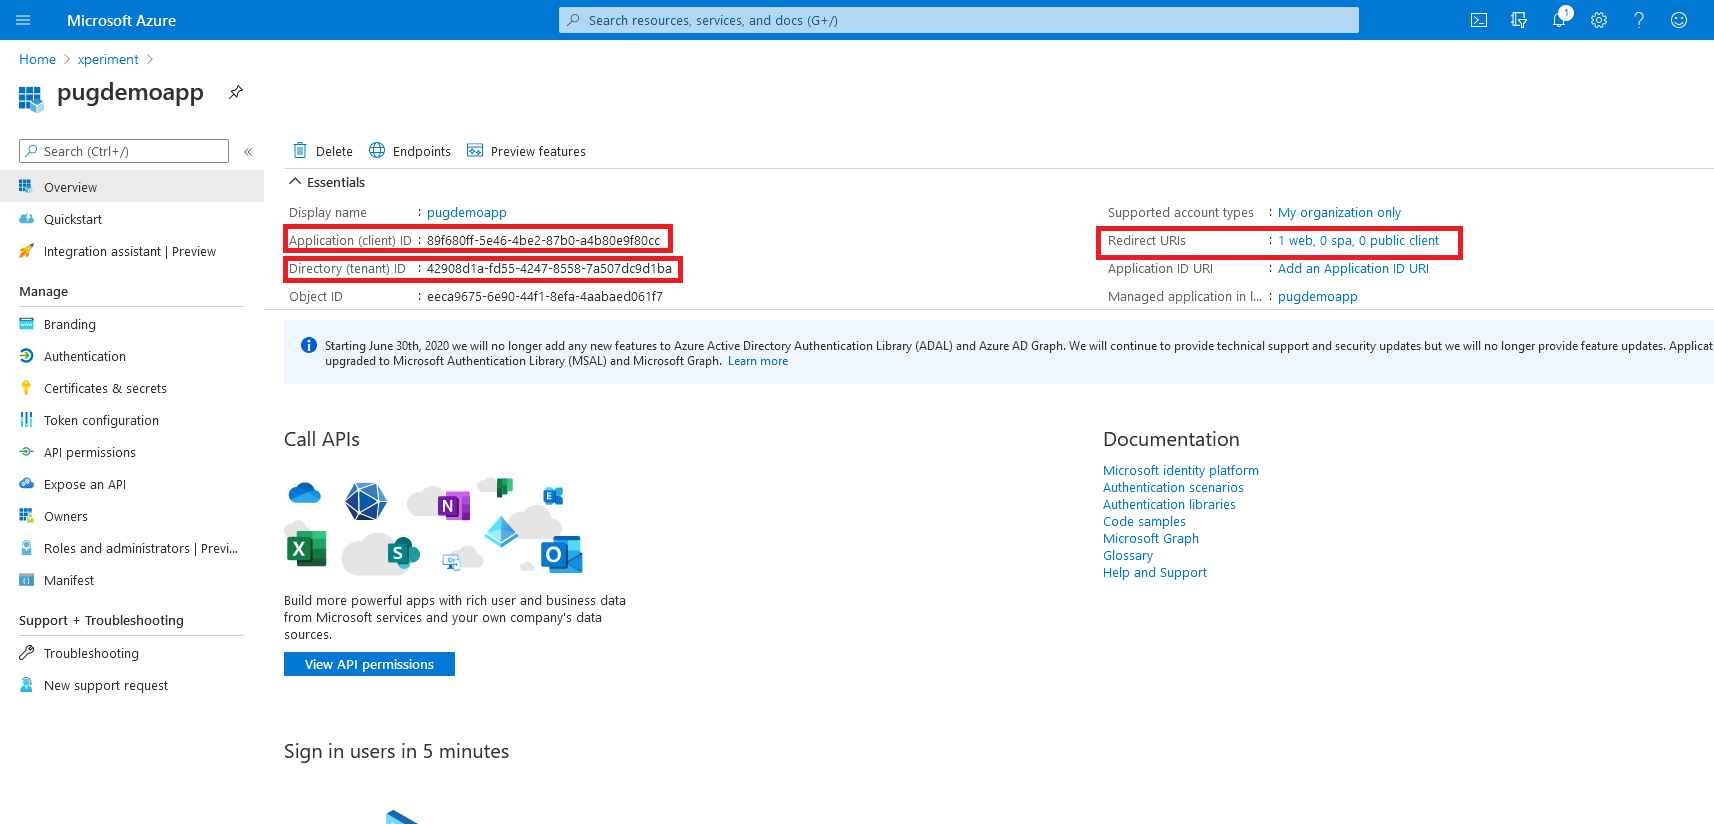
  1. Tenant Id = Can be fetched from the active directory or the app itself
  2. Client Id = Can be fetched from the application detail present in the Azure portal.
  3. Redirect_uri = This you set in the AD application that you have created.
  4. response_type = code (since we are following auth code grant request)
  5. scope = This if you keep default will include the permission set on the application or it can be comma-separated permission

Once we have the required information we will be following this flow: –

The detail about this process is mentioned in the Microsoft document itself so I am not going to repeat the same information here but what I wanted you to understand that the process can be considered as 3 step process: –

  1. Request Authorization code – User will hit the login button which will take the user to a site with the URL which will look like https://login.microsoftonline.com/<tenant>/oauth/v2.0/authorize?<some set of parameters>. After the user enters their credentials, the user will be redirected back to the redirect_uri specified while raising the request with the value of the code.
  2. Fetch the access token – With the code received in the previous step, you can raise a request to fetch the access token as specified here. With the success of this request, you will receive an access token.
  3. Call the API – With the access token received in the last step, you can call the API for which you wanted to authenticate. You can call the graph API or any other API for which you had specified the scope by passing this access token in the header. Reference.

This OAuth in itself is a very interesting topic but I am not spending a lot of time here to explain this because my friend Omkar Khair will be publishing an article by next week which I will link here as soon as it is available.

With the above request, you can authenticate the user using OAuth 2.0.

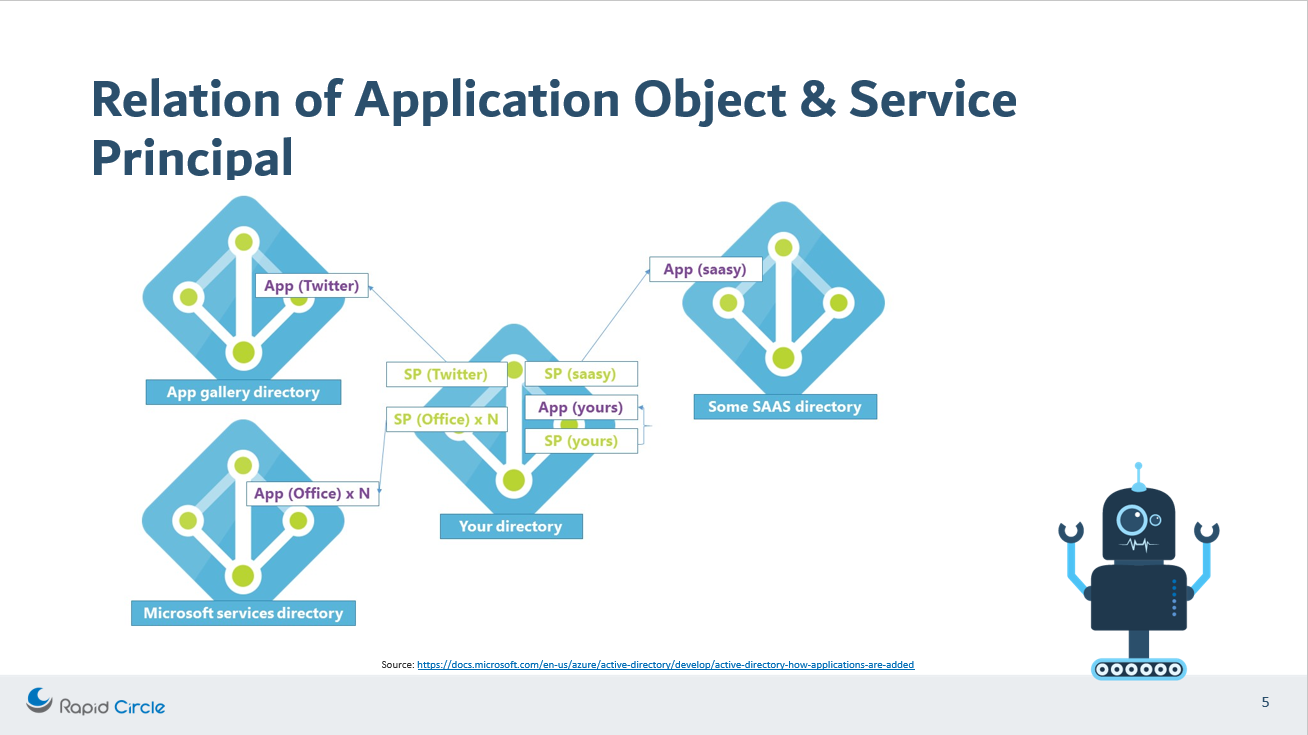
Now, the next question is how do the permission and consent work here. To answer it in simple term – When a request to fetch the auth code was raised then it checks if the user who is authenticating has consented or not. If the user has not consented for the permission that is specified and if the admin consent was not granted for those permissions then User will be shown a consent screen.

Once the user gives his/her consent then that is registered in the application present in the user’s tenant directory.

Now, let’s talk about how delegated permissions can be accessed without user login.

The simple answer is no, without showing the user interactive login an app cannot access the delegated permissions. At least once the app has to show the interactive login.

Wait, we just said at least once. What does this mean? Does this mean that we can access delegated permissions via an app if we have authenticated the user once with interactive login? The answer is YES!

To make this possible “offline_access” scope is also passed in the request. When we pass “offlince_access” in the scope when we request for auth code, we will be authenticating as usual and you won’t see any difference.

But, when you will be sending the next request to fetch the access token, you will get “refresh_token” as well in the response. This refresh_token is valid for 90 days. “access_token” that is fetched is valid for 1 hour by default. So, what does this mean?

This means that you can use refresh_token to get a new access token. Consider, you got “code” from the first request (offline_access was also passed in the scope), after which you raised a request to fetch access token. Now, this access token is valid for 1 hour.

Now, if you come tomorrow and want to access on behalf of that user without making the user log in again then you will be using refresh_token to fetch new access_token. When you will receive the response, you will receive access_token as well as new refresh_token. You can store this refresh_token at your end and use this again to request for new access_token next time.

This way you will be able to use the user’s context of delegated permission till the time the refresh_token is valid. A freshly issued refresh token is valid for 90 days even if it is inactive.

Let’s understand Azure AD application and it’s permissions – Part 1 — October 25, 2020

Let’s understand Azure AD application and it’s permissions – Part 1

Hello everyone, I recently took a webinar on “Understanding Azure AD application”. Thanks to Pune User Group for organizing the webinar and helping me to share my knowledge with the community. I decided to write a blog about the same for anyone who wants to revisit this topic. 

So, what are we going to learn from the rest of the article? 

I am going to divide this post in 2 parts.

Part 1 – We are going to explore: –

What is an Azure AD application? 

How are the service principal and an application object related to each other? 

What are the different types of permission available? And how do they differ from each other? 

Part 2 – We are going to explore: –

How you can authenticate a user using AD application? How OAuth2.0 plays a role here.

How permission and consent that we set works here?

How you can access delegated permission without making the user login every time?

Let’s start with the topic.

What is an Azure AD application?

There are a lot of different definitions available for the AD application. But I like to consider the understanding in this way – AD application is like a broker that will help in performing the authentication with Microsoft services, this application will be a trusted app which Microsoft can validate. Now saying this, I want you to understand whenever we talk about AD application then there are two representation of it: –

  1. Application Objects
  2. Service Principal

Application objects can be considered as the definition of an application, or you may consider this as a schema of the application. Whereas, the service principal can be considered as an instance of an application. Service Principal generally refers to an application object.

There is a very good article by Microsoft (https://docs.microsoft.com/en-us/azure/active-directory/develop/active-directory-how-applications-are-added) which explain this. I will try to explain that in simple terms in the next few sections.

Application Object

The application object is created as soon as you create an AD application. Only one application object at max can be created per application. The properties that you define to the application as if it is a single-tenant or multi-tenant application, or name of the application, redirect URIs and may other properties. Point to remember that an application object will only be present in its home directory. You might be having a question as to why are we mentioning about an application object presence in the home directory? Because we are going to see in the next few minutes that the service principal can exist in another tenant as well.

Service Principal

The service principal can be considered as the instance of the application. This instance can be present in our home directory as well as in another directory. The service principal connects to the application object, hence it has a reference back to the original application via the application Id.

Since we understand about application object and Service Principal, let’s reiterate on the topic as how are they connected.

To make it simple, understand this concept that there is only one application object which is present at home directory which is referenced by one or more service principal present at home directory as well as other directories.

If you want to see this service principal in your directory which is connected to the application object present in the source directory then visit the Enterprise application in the Azure portal active directory section. The enterprise application that you will see here are the service principals of the applications which are present in some other directory.

Different types of permission available for an AD application

When we create an AD application then by default “User.Read” permission is added for the application. This results in auto-creation of the service principal.

There are two types of permissions available:-

  1. Delegated Permission – Use this permission when you want to call the web API as the logged-in user. This type of permission will never have more access than the access of the logged-in user. 
  2. Application Permission – Use this permission when you want your application to call the API itself without the need of the logged-in user. This type of permission can have more level of access than the logged-in user. This type of permission requires administrator consent.

If you want to see this in action then go to your registered app – https://portal.azure.com/#blade/Microsoft_AAD_IAM/ActiveDirectoryMenuBlade/RegisteredApps and open the application which you have created. If you have not created any application then you can create an application by following these steps – https://docs.microsoft.com/en-us/azure/active-directory/develop/quickstart-register-app#configure-a-client-application-to-access-web-apis

Once you have opened your application then click on API Permission—> Add permission —> select API —> select type of permission here

Explore this area to see which permissions are present in each type of permissions.

Thank you for reading until the end of the first part of the article. I will be writing the 2nd part of this article which will explain how you can authenticate a user using AD application and how permission and consent plays a role here. We will also be exploring how a delegated permission can be accessed without the need of the logged-in user.

Meanwhile, please let me know in comments about any question or your feedback on this post.

Have an amazing day! Stay fit, keep learning and keep sharing 🙂

Understanding Azure fundamentals – Sinhgad College Webinar — July 22, 2020

Understanding Azure fundamentals – Sinhgad College Webinar

I recently took a webinar on understanding the Azure cloud for students from different engineering background and colleges.

I was surprised to see that more than 190 students attended the webinar and they were very enthusiastic about learning azure cloud.

In this webinar, we discussed the Azure cloud fundamentals. Since we had only 1 hour with us, I explained some concepts and services of Azure like: –

  1. Azure Web app
  2. Azure CDN
  3. Azure SQL Database
  4. Traffic manager
  5. Availability sets
  6. Azure Storage (blob storage, file storage)
  7. Azure front door

Who doesn’t love a practical explanation of the concepts? Keeping this in mind I explained above concepts in a demo. The demo was framed around a story that during this Covid-19 time regular restaurant was not able to have a physical presence of the customers and they decided to provide home food deliveries from their restaurant. 

I showed them how simple flow of the solution will look like below.

Later showed them how the architecture will look in detailed. Explained how each service will benefit at what point and why it is necessary.

Taken the reference from https://docs.microsoft.com/en-us/azure/architecture&nbsp;

The webinar recording can be found here – https://bit.ly/understanding-azure

Download Azure Storage files locally having files and directories – C# — March 2, 2019

Download Azure Storage files locally having files and directories – C#

Recently while implementing one feature for a product I encountered an issue of storing the Azure Blobs on my local machine.

What I wanted to achieve:
I wanted to iterate through the Blob storage which contains files and directories. The directories contain some files and I wanted to store all these files on my local machine with the same structure.
This is how my Azure Blob container structure is:

On AzureStorage Explorer this is how it looks

The issue was the directory which we see in Azure is not exactly a directory but is just a prefix to the blob file. So it was difficult to know which one is the directory as we will need that to create the same directory locally.

Solution:
After spending a few hours I realized we can fetch a BlockBlob and the directory by specifying the type of the blob. The following code seems simple once found but it took some time to figure out this is a possibility

This is the snapshot of the complete code. I have added comments that will help.

The complete solution can be found here: https://github.com/loflet/AzureBlobStorage
Feel free to comment on any issues or suggestion for this post.

Dhanyawad,
Sanket

Microsoft Azure Cosmos DB and Cognitive Service – Get Started — August 20, 2017

Microsoft Azure Cosmos DB and Cognitive Service – Get Started

Do you love to develop mobile apps? Do you love to write code for Android or iPhone or Windows platform? If so, you will love to read following post.

Recently, we conducted a 2-day Xamarin Event at Rajarambapu Institute of Technology, Islampur. They have one of the best libraries we have ever seen. Mayur Tendulkar is Program Manager on Xamarin team at Microsoft India and he was the speaker for this session. Other than having tea 5 times a day we had his fantastic session and a lot of Gyan!

Don’t you think they have a beautiful library?


With Xamarin you can develop applications for Android, IOS and Windows with JUST ONE LANGUAGE! Yes, you heard it right! You can write applications on all three platform with all Native API’s of that platform with just one language that is C#.

Well, we learned 2 major things and settled with 3 projects: –

  1. Cognitive services

Microsoft has this beautiful service which will make a lot of your work easier. Microsoft Cognitive Service will help you to build some powerful apps with algorithms to see, hear, speak, understand and interpret using natural methods of communication.

With just few lines of code you can add features like Detect the emotion of a person, find face, Translate any text to any language etc.

To develop these apps you will need to have Microsoft Azure subscription. If you want to try out features of Microsoft Azure you can get a month free Azure account. – https://azure.microsoft.com/en-in/offers/ms-azr-0044p/

We developed 2 apps using Cognitive Services

This is one easy app that will help you to translate text from any language to any other language. With just a few lines of code, you can develop this app. Mayur has simplified the steps to create this app. You can follow the steps at https://github.com/mayur-tendulkar/Mini-Hacks/tree/master/Translator%20API

Do you love to use emojis and play around it? You will love to work on this app with minimum efforts using Microsoft Emotion API. You can create this with simple steps which will help you to detect emotions of the user. Follow these steps to create a simple app https://github.com/mayur-tendulkar/Mini-Hacks/tree/master/Emotion%20API

  1. Azure Cosmos DB

Okay so now this is one interesting topic which might catch your interest! Most of us have been using Relational Database for our data, we keep try maintaining the schema and keep making it more complex which has some advantages but with more tables and more relation, it keeps getting complex.

So, what is the solution to make your database Schema Free? Yes you are thinking the right way, we will use NoSQL for this. Microsoft provides one awesome service which they have recently included in Azure, this new service is Cosmos DB. 

Cosmos DB has enables us to elastically and independently scale throughput and storage across any number of Azure’s geographic regions. Key features of the Cosmos DB are: –

  1. Global Distribution of DB with a click of a button.
  2. Multiple data models and some popular APIs for accessing and querying data.
  3. Scale database throughput per second and change anytime you want.
  4. With very low end-to-end latency you can build highly responsive applications.
  5. 99% availability with a single region.
  6. Low cost of ownership.

More details about the feature can be found here https://docs.microsoft.com/en-us/azure/cosmos-db/introduction

In our session, we developed an app for a Tea company which have their stores located in multiple regions of the world. We used Cosmos DB to replicate the DB and use the API to perform CRUD operations on our DB. With few lines of code, we were able to develop this app. The steps which we followed for the app can be found here https://github.com/mayur-tendulkar/CosmosDB

Some glimpse of the sessions


I hope this post will help you to introduce you to Azure Cognitive Services and Cosmos DB. Will love to hear your feedback, please drop a comment.

Dhanyawad,

Sanket Ghorpade