Sanket Ghorpade

Search–>Patterns—>Connect—->Innovate

Let’s understand Azure AD application and it’s permissions – Part 2 — November 1, 2020

Let’s understand Azure AD application and it’s permissions – Part 2

Namaste and welcome back to my blog post.

This post is in continuation with the previous post where I explained about the Azure AD application and the permissions. In this post, I am going to cover the remaining part of the webinar which I took last week.

We are going to explore: –

How you can authenticate a user using AD application? How OAuth2.0 plays a role here.

How permission and consent that we set works here?

How you can access delegated permission without making the user login every time?

Earlier I planned to cover all these topics but recently my very good friend Omkar Khair took an awesome webinar on OAuth. He has explained how we OAuth the way we do. So, rather than repeating the same information here. I will suggest you visit his blog post (link will be published by next week) to dig deep about OAuth 2.0.

Meanwhile, I will cover the above topics in brief: –

Let’s try to understand how you can authenticate a user using the AD application.

To authenticate a user with Azure AD application OAuth flow is used. We will be exploring OAuth 2.0 authorization code grant flow in this blog post. You can find the most authentic information about OAuth protocol here

I have broken down the OAuth 2.0 auth code grant flow in simple terms that I understand. There are multiple ways by which OAuth 2.0 can be executed like by using implicit grant flow, auth code grant, on-behalf of flow and few other which you can find here.

To simply put the authentication code grant flow, I have divided it into 3 parts: –

  1. Requesting Authorization code
  2. Fetching access token
  3. Calling the API

To request an authorization code, you will need: –

  1. Tenant Id = Can be fetched from the active directory or the app itself
  2. Client Id = Can be fetched from the application detail present in the Azure portal.
  3. Redirect_uri = This you set in the AD application that you have created.
  4. response_type = code (since we are following auth code grant request)
  5. scope = This if you keep default will include the permission set on the application or it can be comma-separated permission

Once we have the required information we will be following this flow: –

The detail about this process is mentioned in the Microsoft document itself so I am not going to repeat the same information here but what I wanted you to understand that the process can be considered as 3 step process: –

  1. Request Authorization code – User will hit the login button which will take the user to a site with the URL which will look like https://login.microsoftonline.com/<tenant>/oauth/v2.0/authorize?<some set of parameters>. After the user enters their credentials, the user will be redirected back to the redirect_uri specified while raising the request with the value of the code.
  2. Fetch the access token – With the code received in the previous step, you can raise a request to fetch the access token as specified here. With the success of this request, you will receive an access token.
  3. Call the API – With the access token received in the last step, you can call the API for which you wanted to authenticate. You can call the graph API or any other API for which you had specified the scope by passing this access token in the header. Reference.

This OAuth in itself is a very interesting topic but I am not spending a lot of time here to explain this because my friend Omkar Khair will be publishing an article by next week which I will link here as soon as it is available.

With the above request, you can authenticate the user using OAuth 2.0.

Now, the next question is how do the permission and consent work here. To answer it in simple term – When a request to fetch the auth code was raised then it checks if the user who is authenticating has consented or not. If the user has not consented for the permission that is specified and if the admin consent was not granted for those permissions then User will be shown a consent screen.

Once the user gives his/her consent then that is registered in the application present in the user’s tenant directory.

Now, let’s talk about how delegated permissions can be accessed without user login.

The simple answer is no, without showing the user interactive login an app cannot access the delegated permissions. At least once the app has to show the interactive login.

Wait, we just said at least once. What does this mean? Does this mean that we can access delegated permissions via an app if we have authenticated the user once with interactive login? The answer is YES!

To make this possible “offline_access” scope is also passed in the request. When we pass “offlince_access” in the scope when we request for auth code, we will be authenticating as usual and you won’t see any difference.

But, when you will be sending the next request to fetch the access token, you will get “refresh_token” as well in the response. This refresh_token is valid for 90 days. “access_token” that is fetched is valid for 1 hour by default. So, what does this mean?

This means that you can use refresh_token to get a new access token. Consider, you got “code” from the first request (offline_access was also passed in the scope), after which you raised a request to fetch access token. Now, this access token is valid for 1 hour.

Now, if you come tomorrow and want to access on behalf of that user without making the user log in again then you will be using refresh_token to fetch new access_token. When you will receive the response, you will receive access_token as well as new refresh_token. You can store this refresh_token at your end and use this again to request for new access_token next time.

This way you will be able to use the user’s context of delegated permission till the time the refresh_token is valid. A freshly issued refresh token is valid for 90 days even if it is inactive.

Let’s understand Azure AD application and it’s permissions – Part 1 — October 25, 2020

Let’s understand Azure AD application and it’s permissions – Part 1

Hello everyone, I recently took a webinar on “Understanding Azure AD application”. Thanks to Pune User Group for organizing the webinar and helping me to share my knowledge with the community. I decided to write a blog about the same for anyone who wants to revisit this topic. 

So, what are we going to learn from the rest of the article? 

I am going to divide this post in 2 parts.

Part 1 – We are going to explore: –

What is an Azure AD application? 

How are the service principal and an application object related to each other? 

What are the different types of permission available? And how do they differ from each other? 

Part 2 – We are going to explore: –

How you can authenticate a user using AD application? How OAuth2.0 plays a role here.

How permission and consent that we set works here?

How you can access delegated permission without making the user login every time?

Let’s start with the topic.

What is an Azure AD application?

There are a lot of different definitions available for the AD application. But I like to consider the understanding in this way – AD application is like a broker that will help in performing the authentication with Microsoft services, this application will be a trusted app which Microsoft can validate. Now saying this, I want you to understand whenever we talk about AD application then there are two representation of it: –

  1. Application Objects
  2. Service Principal

Application objects can be considered as the definition of an application, or you may consider this as a schema of the application. Whereas, the service principal can be considered as an instance of an application. Service Principal generally refers to an application object.

There is a very good article by Microsoft (https://docs.microsoft.com/en-us/azure/active-directory/develop/active-directory-how-applications-are-added) which explain this. I will try to explain that in simple terms in the next few sections.

Application Object

The application object is created as soon as you create an AD application. Only one application object at max can be created per application. The properties that you define to the application as if it is a single-tenant or multi-tenant application, or name of the application, redirect URIs and may other properties. Point to remember that an application object will only be present in its home directory. You might be having a question as to why are we mentioning about an application object presence in the home directory? Because we are going to see in the next few minutes that the service principal can exist in another tenant as well.

Service Principal

The service principal can be considered as the instance of the application. This instance can be present in our home directory as well as in another directory. The service principal connects to the application object, hence it has a reference back to the original application via the application Id.

Since we understand about application object and Service Principal, let’s reiterate on the topic as how are they connected.

To make it simple, understand this concept that there is only one application object which is present at home directory which is referenced by one or more service principal present at home directory as well as other directories.

If you want to see this service principal in your directory which is connected to the application object present in the source directory then visit the Enterprise application in the Azure portal active directory section. The enterprise application that you will see here are the service principals of the applications which are present in some other directory.

Different types of permission available for an AD application

When we create an AD application then by default “User.Read” permission is added for the application. This results in auto-creation of the service principal.

There are two types of permissions available:-

  1. Delegated Permission – Use this permission when you want to call the web API as the logged-in user. This type of permission will never have more access than the access of the logged-in user. 
  2. Application Permission – Use this permission when you want your application to call the API itself without the need of the logged-in user. This type of permission can have more level of access than the logged-in user. This type of permission requires administrator consent.

If you want to see this in action then go to your registered app – https://portal.azure.com/#blade/Microsoft_AAD_IAM/ActiveDirectoryMenuBlade/RegisteredApps and open the application which you have created. If you have not created any application then you can create an application by following these steps – https://docs.microsoft.com/en-us/azure/active-directory/develop/quickstart-register-app#configure-a-client-application-to-access-web-apis

Once you have opened your application then click on API Permission—> Add permission —> select API —> select type of permission here

Explore this area to see which permissions are present in each type of permissions.

Thank you for reading until the end of the first part of the article. I will be writing the 2nd part of this article which will explain how you can authenticate a user using AD application and how permission and consent plays a role here. We will also be exploring how a delegated permission can be accessed without the need of the logged-in user.

Meanwhile, please let me know in comments about any question or your feedback on this post.

Have an amazing day! Stay fit, keep learning and keep sharing 🙂

Understanding Azure fundamentals – Sinhgad College Webinar — July 22, 2020

Understanding Azure fundamentals – Sinhgad College Webinar

I recently took a webinar on understanding the Azure cloud for students from different engineering background and colleges.

I was surprised to see that more than 190 students attended the webinar and they were very enthusiastic about learning azure cloud.

In this webinar, we discussed the Azure cloud fundamentals. Since we had only 1 hour with us, I explained some concepts and services of Azure like: –

  1. Azure Web app
  2. Azure CDN
  3. Azure SQL Database
  4. Traffic manager
  5. Availability sets
  6. Azure Storage (blob storage, file storage)
  7. Azure front door

Who doesn’t love a practical explanation of the concepts? Keeping this in mind I explained above concepts in a demo. The demo was framed around a story that during this Covid-19 time regular restaurant was not able to have a physical presence of the customers and they decided to provide home food deliveries from their restaurant. 

I showed them how simple flow of the solution will look like below.

Later showed them how the architecture will look in detailed. Explained how each service will benefit at what point and why it is necessary.

Taken the reference from https://docs.microsoft.com/en-us/azure/architecture&nbsp;

The webinar recording can be found here – https://bit.ly/understanding-azure

Download Azure Storage files locally having files and directories – C# — March 2, 2019

Download Azure Storage files locally having files and directories – C#

Recently while implementing one feature for a product I encountered an issue of storing the Azure Blobs on my local machine.

What I wanted to achieve:
I wanted to iterate through the Blob storage which contains files and directories. The directories contain some files and I wanted to store all these files on my local machine with the same structure.
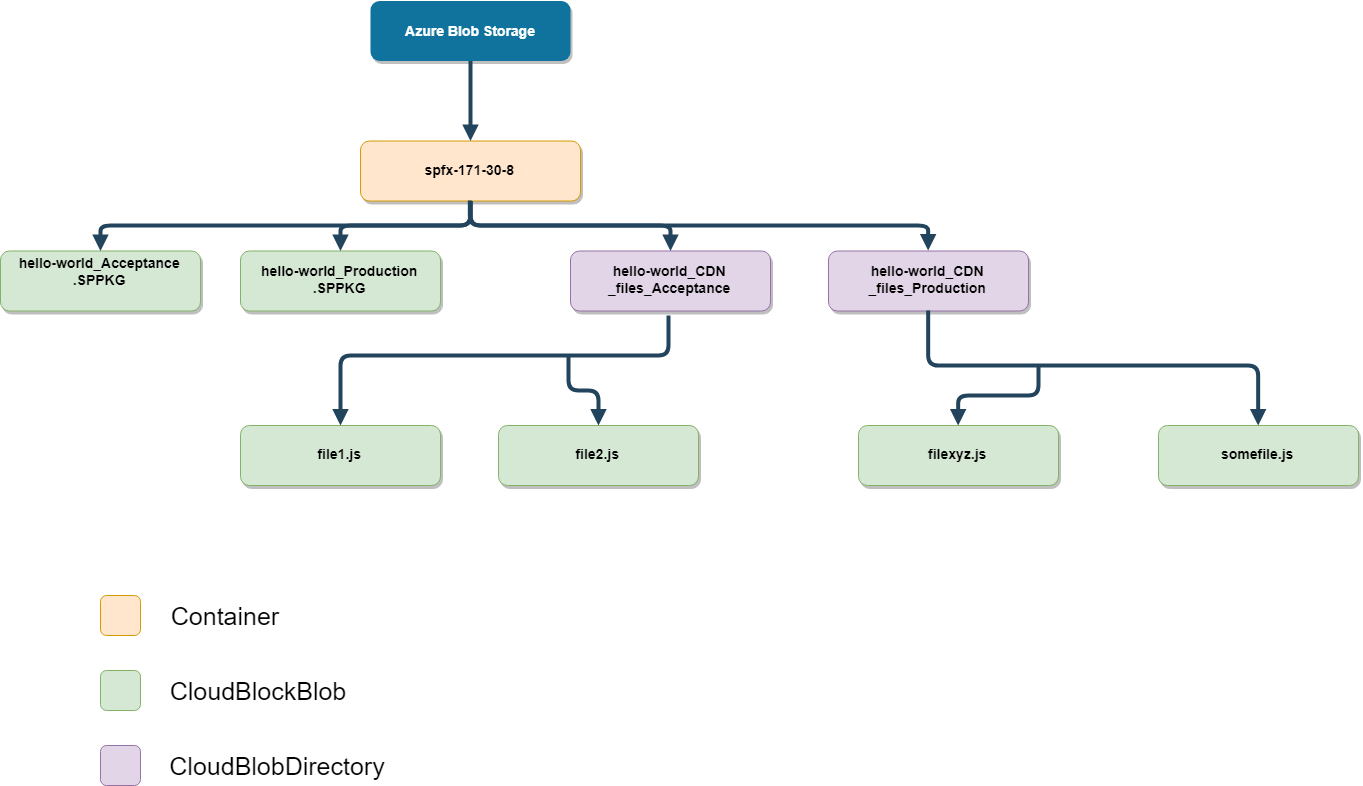
This is how my Azure Blob container structure is:

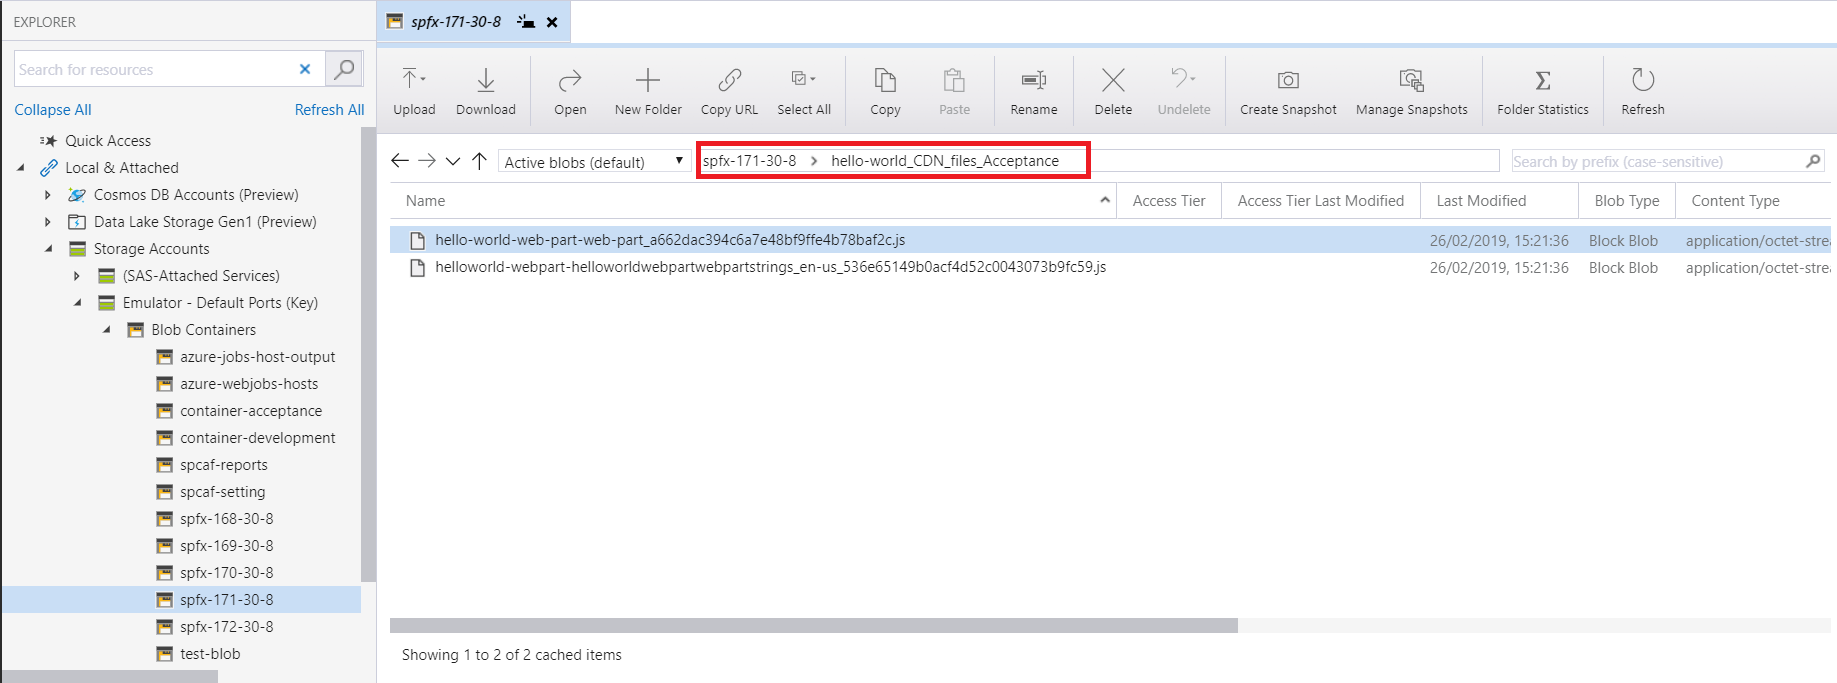
On AzureStorage Explorer this is how it looks

The issue was the directory which we see in Azure is not exactly a directory but is just a prefix to the blob file. So it was difficult to know which one is the directory as we will need that to create the same directory locally.

Solution:
After spending a few hours I realized we can fetch a BlockBlob and the directory by specifying the type of the blob. The following code seems simple once found but it took some time to figure out this is a possibility

This is the snapshot of the complete code. I have added comments that will help.

The complete solution can be found here: https://github.com/loflet/AzureBlobStorage
Feel free to comment on any issues or suggestion for this post.

Dhanyawad,
Sanket

Microsoft Azure Cosmos DB and Cognitive Service – Get Started — August 20, 2017

Microsoft Azure Cosmos DB and Cognitive Service – Get Started

Do you love to develop mobile apps? Do you love to write code for Android or iPhone or Windows platform? If so, you will love to read following post.

Recently, we conducted a 2-day Xamarin Event at Rajarambapu Institute of Technology, Islampur. They have one of the best libraries we have ever seen. Mayur Tendulkar is Program Manager on Xamarin team at Microsoft India and he was the speaker for this session. Other than having tea 5 times a day we had his fantastic session and a lot of Gyan!

Don’t you think they have a beautiful library?


With Xamarin you can develop applications for Android, IOS and Windows with JUST ONE LANGUAGE! Yes, you heard it right! You can write applications on all three platform with all Native API’s of that platform with just one language that is C#.

Well, we learned 2 major things and settled with 3 projects: –

  1. Cognitive services

Microsoft has this beautiful service which will make a lot of your work easier. Microsoft Cognitive Service will help you to build some powerful apps with algorithms to see, hear, speak, understand and interpret using natural methods of communication.

With just few lines of code you can add features like Detect the emotion of a person, find face, Translate any text to any language etc.

To develop these apps you will need to have Microsoft Azure subscription. If you want to try out features of Microsoft Azure you can get a month free Azure account. – https://azure.microsoft.com/en-in/offers/ms-azr-0044p/

We developed 2 apps using Cognitive Services

This is one easy app that will help you to translate text from any language to any other language. With just a few lines of code, you can develop this app. Mayur has simplified the steps to create this app. You can follow the steps at https://github.com/mayur-tendulkar/Mini-Hacks/tree/master/Translator%20API

Do you love to use emojis and play around it? You will love to work on this app with minimum efforts using Microsoft Emotion API. You can create this with simple steps which will help you to detect emotions of the user. Follow these steps to create a simple app https://github.com/mayur-tendulkar/Mini-Hacks/tree/master/Emotion%20API

  1. Azure Cosmos DB

Okay so now this is one interesting topic which might catch your interest! Most of us have been using Relational Database for our data, we keep try maintaining the schema and keep making it more complex which has some advantages but with more tables and more relation, it keeps getting complex.

So, what is the solution to make your database Schema Free? Yes you are thinking the right way, we will use NoSQL for this. Microsoft provides one awesome service which they have recently included in Azure, this new service is Cosmos DB. 

Cosmos DB has enables us to elastically and independently scale throughput and storage across any number of Azure’s geographic regions. Key features of the Cosmos DB are: –

  1. Global Distribution of DB with a click of a button.
  2. Multiple data models and some popular APIs for accessing and querying data.
  3. Scale database throughput per second and change anytime you want.
  4. With very low end-to-end latency you can build highly responsive applications.
  5. 99% availability with a single region.
  6. Low cost of ownership.

More details about the feature can be found here https://docs.microsoft.com/en-us/azure/cosmos-db/introduction

In our session, we developed an app for a Tea company which have their stores located in multiple regions of the world. We used Cosmos DB to replicate the DB and use the API to perform CRUD operations on our DB. With few lines of code, we were able to develop this app. The steps which we followed for the app can be found here https://github.com/mayur-tendulkar/CosmosDB

Some glimpse of the sessions


I hope this post will help you to introduce you to Azure Cognitive Services and Cosmos DB. Will love to hear your feedback, please drop a comment.

Dhanyawad,

Sanket Ghorpade

Installing Laravel 5 on Windows — March 8, 2017

Installing Laravel 5 on Windows

1.    Installing XAMP or WAMP Server

  1. Install the XAMP or WAMP server on your system. Download XAMP using https://www.apachefriends.org/download.html
  2. Download any version of XAMP higher than 5.4 PHP.

2.    Installing Composer

  1. The first thing we need is to install composer. If you are new to the PHP development, then composer might be new for you. Composer is tool for dependency management in PHP, like in Visual Studio nuget package manager is used to install any package for your project.
  2. To install composer to http://getcomposer.org and download the windows installer version of it. Direct download link if required – https://getcomposer.org/Composer-Setup.exe
  3. After the download starts installing it. While installing you will see the following image.

composerSetup

You must browse the php.exe location which might be present at this location C:\xampp\php\php.exe if you have installed XAMP.

4. Click Next and proceed with further installation.

3.    Installing Laravel 5

  1. To install Laravel, we will be using composer command.
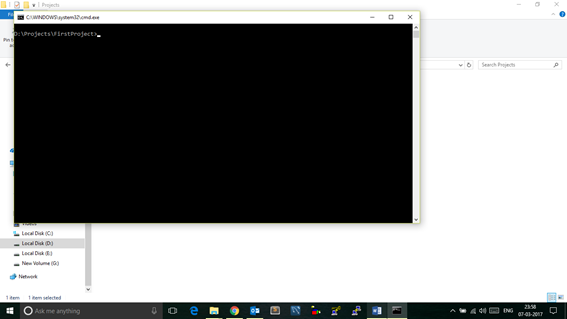
  2. Navigate to the folder where you want to create your project. I am creating my project folder in D:\Projects\FirstProject
  3. Hold the Shift key and press Right Click on the mouse on the folder.

commandPrompt

4. Click on Open command window here. It will open command window with something like this.

commandPrompt2

5. Type following command to install Laravel composer global require “laravel/installer”

This will download some files from internet to your machine. It will take some time depending on your internet connection.

NOTE- This command you should enter only once in one machine. Next time if you want to create any project on the same machine, just skip this step as Laravel will already be installed.

  1. To create project type following command laravel new learningLaravel
  2. It will take some time depending on your internet connection speed. If your new project is created properly you will something like this.
  3. InstalledLaravel
  4. Once the project is created successfully navigate to your project folder using the command cd. In my case, it will be cd learningLaravelnavigating to project folder
  5. Once you are inside your project folder type following command to run your project php artisan serve running laravel
  6. If your project is successfully installed and running then go to the browser and type in address field localhost:8000 websiterunning
  7. If you are able to see the above image then you have successfully installed Laravel and have created a project.

If you face any issues while installing Laravel, drop a comment and I will help you out. Happy Laravel Development. If you like this article please share with your friends 🙂

How dreams are created? — August 22, 2016

How dreams are created?

When we are not working and want to wander off to OUR own world we keep asking questions. One such question that hit my mind continuously is “How are the dreams created?” I read few post around different forums to understand the same. We are not 100% sure about the answer for this but currently I can think of one logical answer.

While we are awake we remember millions of things. Like what was the colour of the car that passed by in the morning, how my friend’s nose is big than others etc. Every memory we think of is formed by very minute-minute details (consider forming an image by every single pixel).

Now when we sleep our body is at rest and cells are healed to regain the strength for tomorrow. But our mind is still working though with less work as compared to daytime. So what is happening here? When we enter REM stage our dream cycle is typically most abundant and best remembered. In this stage, our brain starts deciding what memory of the brain that was captured needs to be remembered and what needs to be dropped. In this stage, it also decides which memory needs to be moved to Permanent memory.

While each minute details about the daytime memory are moving and adjusting through various sensors of our brain, it tries to form a story of whatever fragment of memory it is receiving. This is the reason our dreams are so random, at one moment we are walking down in the park and in another moment we are running on a train platform. It is very difficult to have a perfect dream with a perfect storyline as our brain is just forming a story according to the memories been received.

This is one reason which I think make us difficult to remember the dream when we wake up. As soon as we wake up it is easy for us to remember the dream but after few minutes we forget almost 80% of the dream because the story was not actual memory but just a sudo memory created by our brain.

I like to consider that each memory fragment is given one index and according to index the priority of that memory fragment is decided. Something like google page indexing which decides what page to show when User query for any term. The more we put pressure and keep repeating a memory in our brain its index value is improved and pushed to the top. For example, when you buy a new phone number you repeat that number in your mind 5-10 times so that you will remember it but if you have not repeated your number in your mind for a year or two the memory index value is reduced and so it gets difficult to remember.

So next time when you wake up with some random dream, write it down and think about why you saw that place, why you saw that person’s face and you will eventually be able to connect the dots.

Disclaimer: This post is regarding what I think about how the dream is created and it might happen that my theory about dreams is wrong, just expressing what I think.


Does your brain gear work properly? — June 1, 2015

Does your brain gear work properly?

I had to catch a train next day morning at 6:30 AM to go to Pune for PUG meet, but I woke up at 6:00 AM by my second alarm which fortunately was successful for waking me up and realized I am late so I got ready as soon as possible and reached station and caught the train. In this process I realized I am having headache and kind of feel like I am stress, which was quite uncomfortable.

I did some research and found out, our brain consist of basically 4 waves- Alpha(7.5-14Hz, The Deep Relaxation), Beta(14-40Hz, The Waking Consciousness and Reasoning), Theta(4-7.5Hz, The Light Meditation and sleeping), Delta(0.5-4Hz, The Deep Sleep) and Gamma(above 40Hz, The Insight) waves. All waves are necessary to work properly daily to maintain a healthy life cycle. Let us try to understand it in terms of car gears, when we start a car it is in neutral and we put first gear to move it initially, as it get some speed we put second and then third and so on. We follow the reverse procedure to stop the car, i.e from fourth gear to first to slow it down. Now if we consider this 1,2,3,4 gear as different brainwave then it will be Delta (1st gear), Theta (2nd gear), Alpha (3rd gear) and Beta (4th gear). We won’t be talking about Gamma waves as I rarely have any knowledge about it.

So consider you are tired and you go to sleep, which is a deep sleep and so now you are experiencing Delta (1st gear) wave, as you don’t stay in that stage for long so you come out of it and move to Theta stage (2nd gear) but you are still asleep, at this stage you can hear little voices which is happening outside. Once you woke up normally you are lying on bed with consciousness then you are in Alpha Stage (3rd gear) and finally when you are completely awake and active then you are in Beta (4th gear) stage. This is the normal routine which we should follow ideally but due to the heavy lifestyle which most of us follow we follow pattern of 1st gear and then directly to 4th gear which you can relate now to my story of going for a meet.

In that I was in deep sleep (Delta wave) and because of my alarm I forced by brain to come out of that stage and get active (Beta wave) to catch the train because of which my brain started giving signs that boss you are not following the ideal routine and you need rest, so please rest and releases some signals which says “sleep sleep” but to avoid it I drink Coffee, forcing my brain to stay alive with me and to oppose it brain releases signals which caused headache giving warning it’s not good for your health.

So generally we should follow all gears of our brain for healthy life, which we are ignoring now days because of many factors. I just want to say, boss listen to your brain, if it is sending a signal then it is for some good reason 🙂

I hope you loved to read this post, let me know your thoughts on this by commenting and do share it to your friends who follow some hectic routine, this might help them 🙂

A step towards connecting brains — December 31, 2014

A step towards connecting brains

As I explained in previous post Understanding your brain that our brain is complex but we can make life simpler if we understand our own brain. I was very curious to  know about it, and how it works inside out. This curiosity led me to buy a hardware “Neurosky Mindwave mobile” which helps me to analyze my brain signals and understand it in real world by showing different waves such as alpha, beta, theta, gamma. Every thought i think makes a pattern which I can see with the help of that hardware.

I recently visited some of my friends who work at Pune and they helped me with one idea that may be possible to implement, it is just a theory that we have discussed and hopefully it will come into picture quite a time later.

So the theory is: Whenever our brain think of a thought the hardware gives a value of alpha, beta, theta and gamma activity. So Omkar Khair(a geek friend :P) said consider we show a person a video of a red ball bouncing having blue background so it will create some values for waves and we will save that values, next time we ask the user to think about red ball bouncing in front of blue colour wall, so it will again create the values which will be nearby the same values that we stored and if we are able to equate the two things then we can visualize the red ball bouncing in front of a screen giving what the user is thinking, likewise we can cover few objects and can represent it.

I was really impressed by this theory and actually loved to implement and try it, as I said its just a theory so there are many constraints to it like the sounds hindering the thoughts, smell and other senses that will process some different thought in brain.

If explained in engineering term, the constraint is like I have a wave(thought) and when i am analyzing it, it is been hindered as it was modulated(adding noise and other senses signals) while reaching the destination(brain), we might have to use some algorithms to remove it but it is worth trying!

From Jan month will start working on it and playing around it, I would really appreciate your thoughts on it or if you have some suggestions to ignite the ideas to implementation 🙂

Thank you for reading, stay tuned for further post 🙂

Pre-requisites for WP app dev — July 19, 2014

Pre-requisites for WP app dev

Do you want to know how to get started with Windows Phone app development? Follow the  steps to know the prerequisites for the app development. I will divide the steps into different categorize to make it more easy to understand.

Before you get started with it, you must know few things about Windows Phone which will be helpful to understand this article properly. At the beginning Windows Mobile was launched which eventually failed due to some reasons, later Microsoft came up with Windows Phone which soon caught the eyes of crowd using other smartphones or were thinking to buy one. There are three major versions of Windows Phone which you should remember if you are going to develop Windows Phone application.

  • Windows Phone 7– This was the first version of Windows Phone, which later exalted to Windows Phone 7.8, this is no longer used(used rarely) and the support for this phone is going to end soon. These phones can not be upgraded to higher version anymore.
  • Windows Phone 8– This version made numerous changes in the Phone with different architecture and new features including bluetooth and UI improvements. This version phones are still used and can be up gradable to higher versions phone.
  • Windows Phone 8.1– This version phone is currently the latest in Windows Phone world and consist many new features which helped to grow the market of Windows Phone tremendously.

We will be looking for the development of Windows Phone 8 and Windows Phone 8.1

 Tools

You will require Visual Studio tool for the development. Few get confuse as which version to install as there exists many versions of Visual Studio in store. Let me help you with it, you can Download Visual Studio from this link http://dev.windows.com/en-us/develop/download-phone-sdk

I would recommend you to download the Visual Studio 2013 and Install it, if you face any issues while installing, post the screenshot of the same in comments below.

**Note**: Windows Phone SDK will install in any windows 8 but the emulator will work in only Windows 8(or 8.1) pro or Windows 8(or 8.1) evolution version due to the presence of Hyper-v which is required to run the emulator. But if you have Windows Phone then you can deploy the apps on your phone directly without using emulator.

Language

For the app development, we can develop with more than one languages like C#, HTML5 but we will be learning app development using C#(C sharp) because I personally feel it is preferable over any other languages when it comes to Windows Phone or Windows Store app development.

We will also learn XAML language which will be used for the UI design of the app. Till the time you download the Visual Studio and install it (Yahh! it’s big, and takes time- but don’t worry every good thing takes time to land up 😉 ) You can take course of C# fundamentals for absolute beginners and XAML deep dive. Trust me you will enjoy the course 😉

Ideas

What after the first two steps, the most important thing left is- IDEAS. Yes now whatever you do, whenever you do anything start thinking about ideas, start observing the surrounded areas and think what kind of app do you want to build for Windows Phone.

And so the journey begins, start developing the apps, start creating your own innovations.

Soon will publish next post regarding app development. Meanwhile don’t forget to take App development course from MVA.

Your thoughts on this post and suggestions are welcomed. Keep spreading words.

**Dream Big, Aim Big, Change Big**

-Regards

Sanket Ghorpade